aka
Gimp!
Scooby-Doo!
(if you happen to be in France)
There are 2 different ideas people generally have when they think of lanyards. One is that woven cord that goes around your neck to hold your glasses or ID card or whatever. The other is the craft so many of us remember from summer camp, boy/girl scouts, etc.. This site follows the latter idea.
So What Are Lanyards?
Lanyards are the plastic/acrylic weave/braid craft we encountered at summer camp or in the scouts. They were fun especially because they were one of the very few crafts that you could take with you, away from the craft table, and work on during a hike or in your cabin or while waiting in line.
Gimp? Scooby-Doo?
Other popular names for what the author knows as lanyards include "gimp" and (if you happen to live in France) "scooby-doo."
Where Can I Get Lanyard Materials?
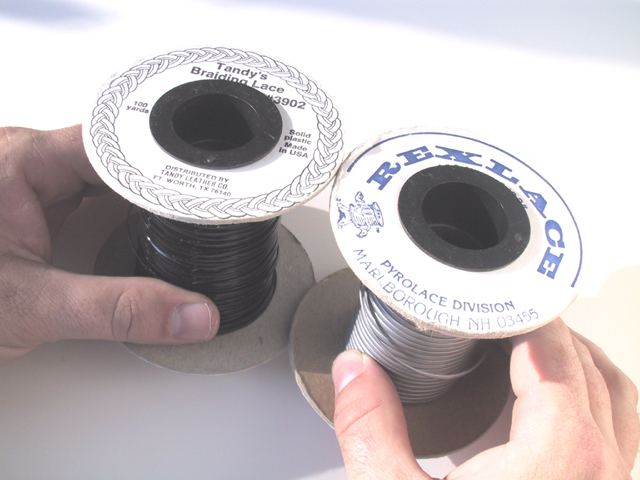
Best place to try is your local craft store. While shorter lengths of string can be purchased, the best deals are the spools. For about $3 you get one 100-yard spool of one color. Colors: Basic colors (red, green, blue, etc.), pastels, neons, and a few odd 'colors' including clear and glow-in-the-dark.
 How To Make A 4-String Lanyard
If you've never made a lanyard before, this is the place to start. 4-string lanyards are the simplest- the basic stitch the others are built off of.
If you learn best by reading, there's plenty of text instructions here. If you learn better by looking at pictures, the pictures here are step-by-step- there isn't much of anything in the instructions that isn't also in the pictures.
Click on any of the pictures to see a bigger version.
I've never been especially stingy about much string I use.
At camp they always gave us 1 yard of each color.
Since then, i've always used the spools of string, measuring off one arm breadth- hand to hand with arms spread out like a cross.
In my case, I end up with about 5 - 5 1/2 feet.
Section 1: 4-String Lanyard, Straight Stitch
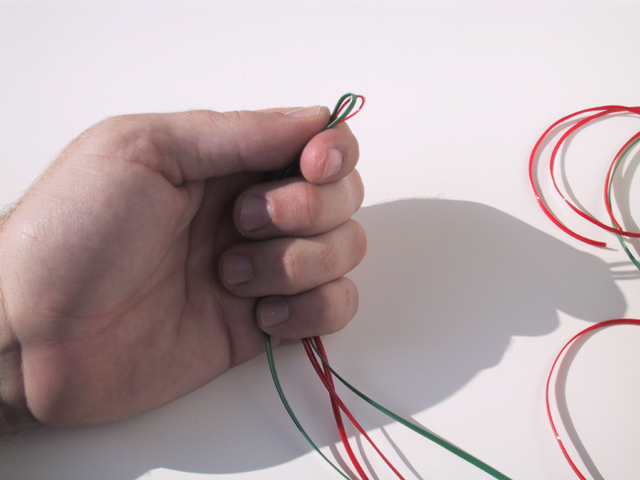
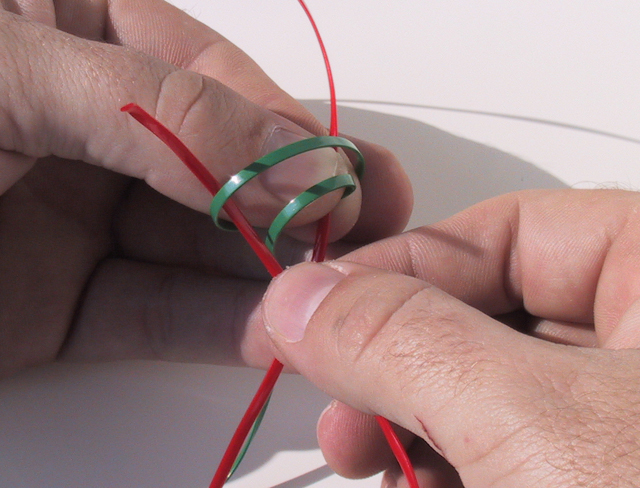
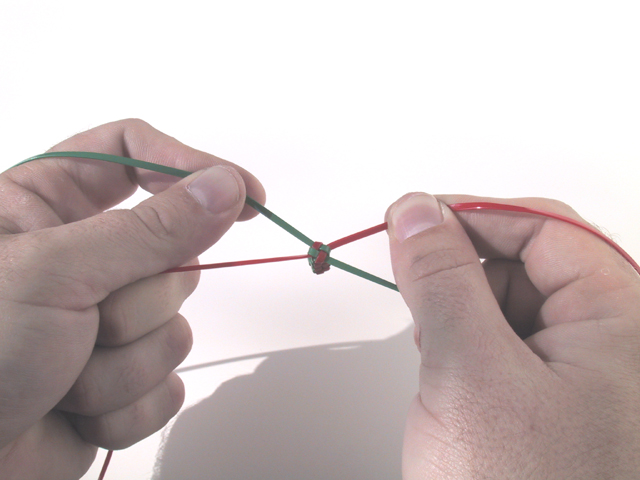
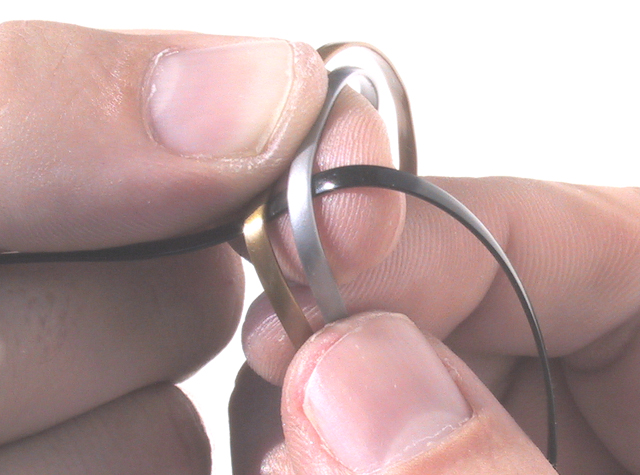
First thing to do is find the middle of each string.
Fold the strings in half.
Then pinch real hard at the center.
This will make a slight crease to mark where the middle is.
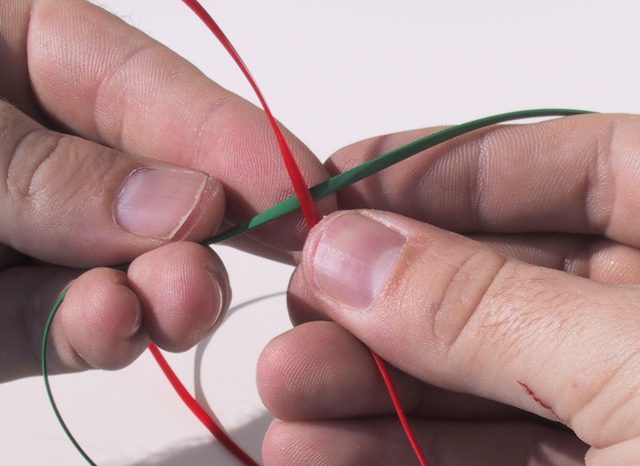
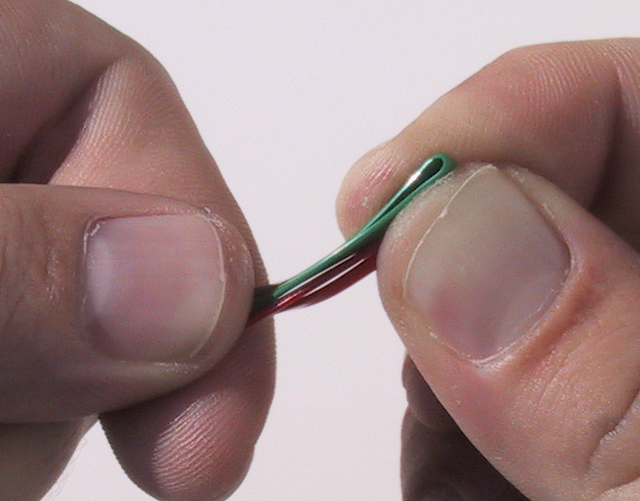
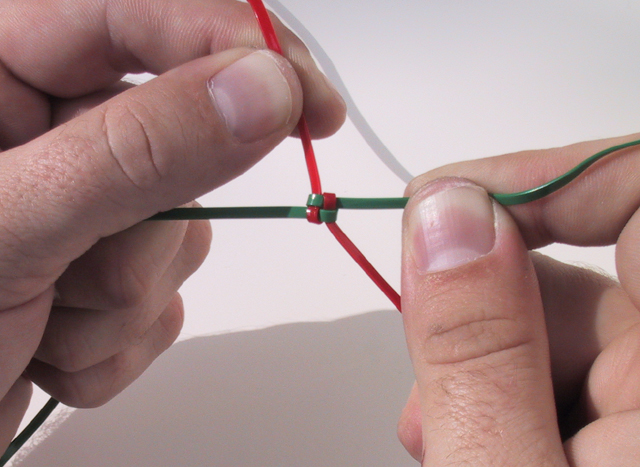
Cross the strings at the middles.
No, every particle in your body will not instantaneously explode at the speed of light.
But lanyards are know to be good at warding off Yugoslavian fashion models.
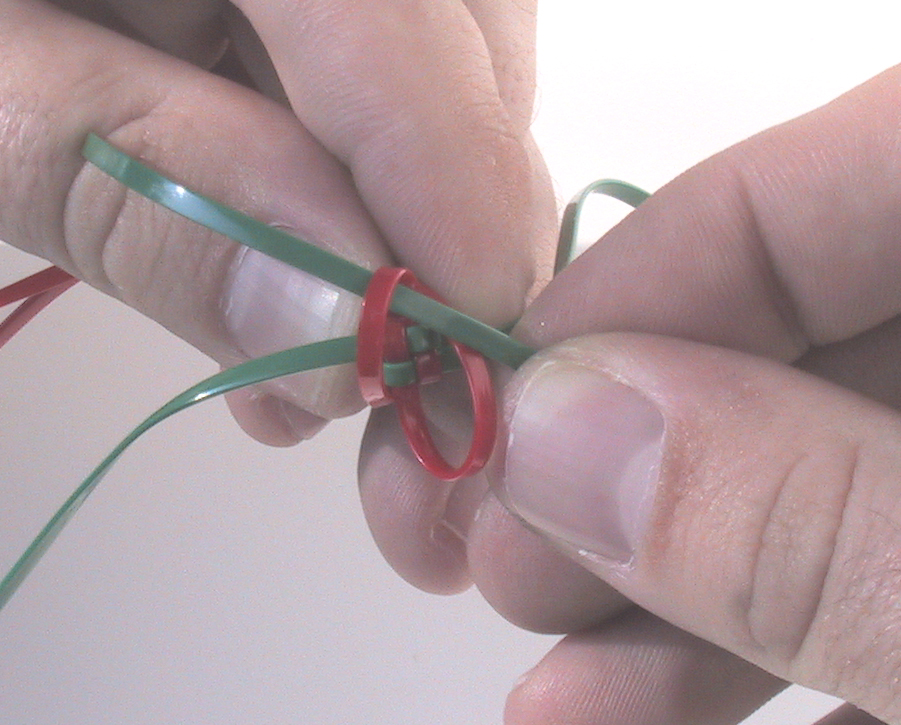
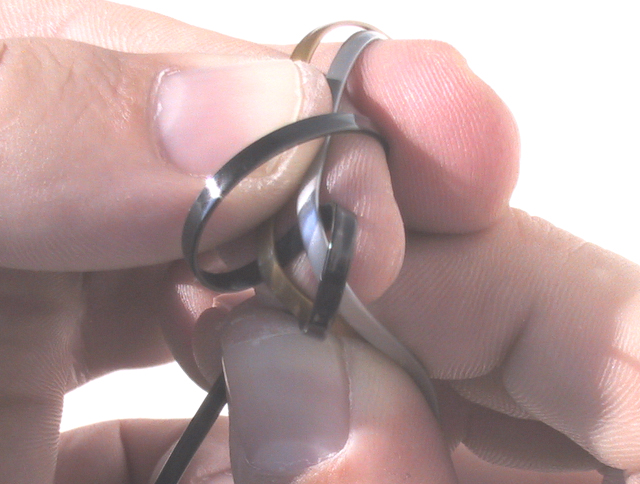
Pinch the strings where they cross like this.
Remember that, in this case, the red string is on top.
Bring one of the bottom strings across.
In this and the following steps, the only important thing as far as how you hold it is to not let go of the middles you're pinching together.
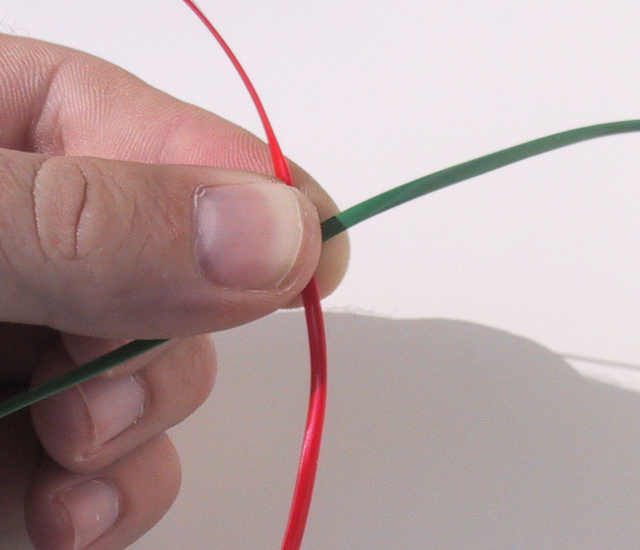
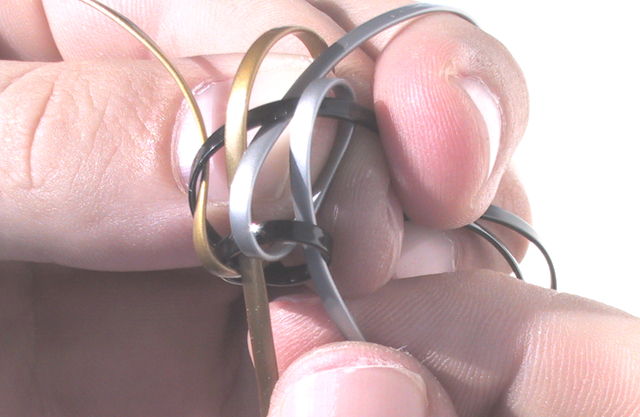
Bring the other other bottom string across the other way.
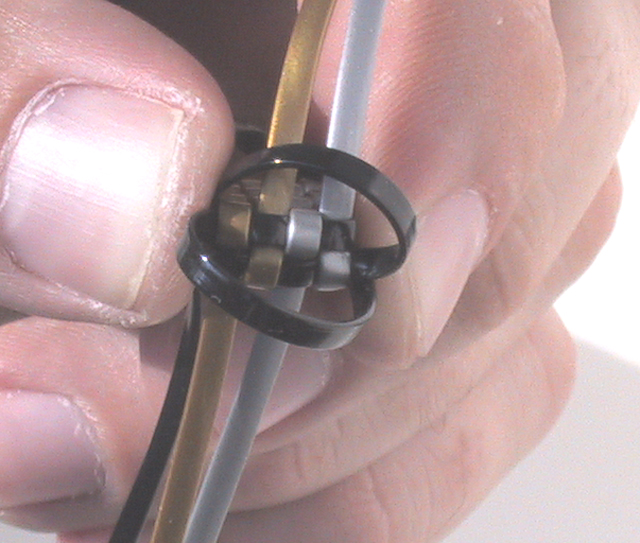
Take one of the upper strings (in this case, red), send it over then under the green strings.
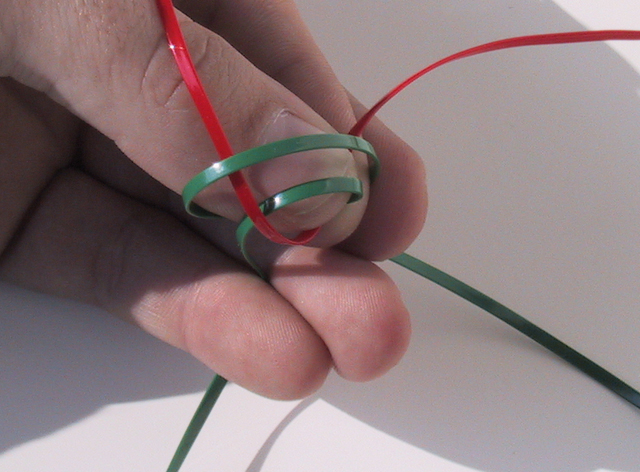
Pull the red string through, just far enough to take up the slack.

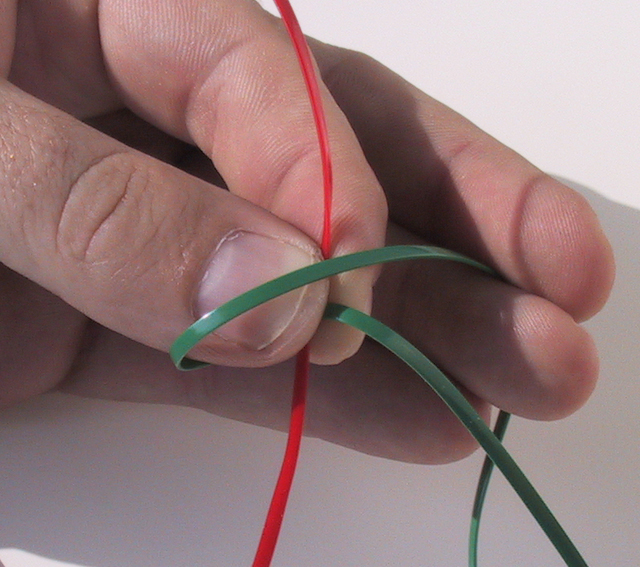
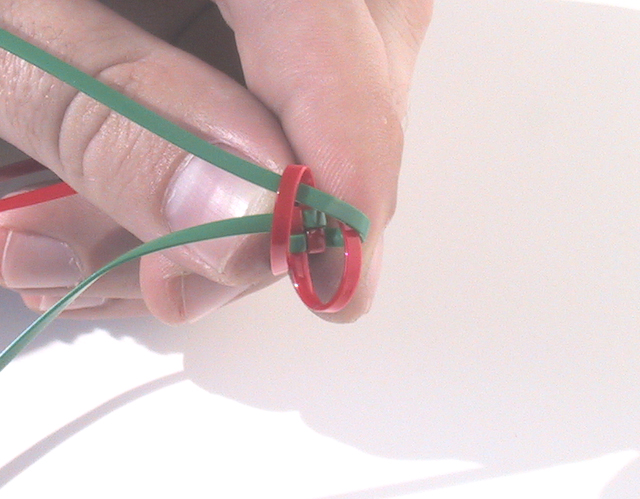
Bring the other red string through, over the first green and under the second.
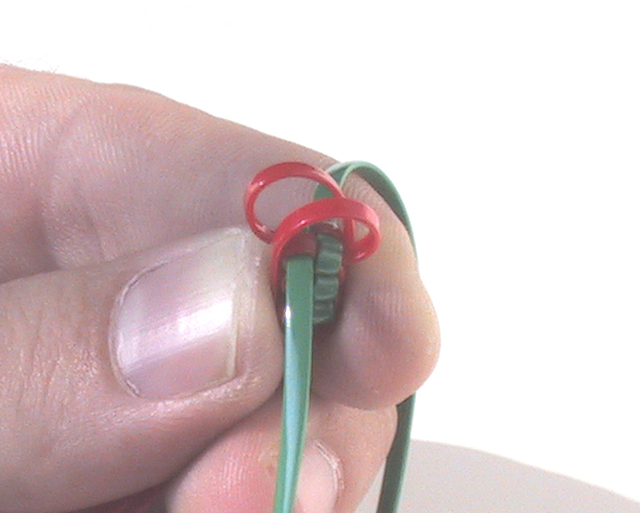
Look at the picture here.
See, where the red string is coming out, how the green loop will stop it from falling out to the right?
It has to go through the green loop like this or the stitch won't work.
Pull this red string through, just far enough to take up the slack.
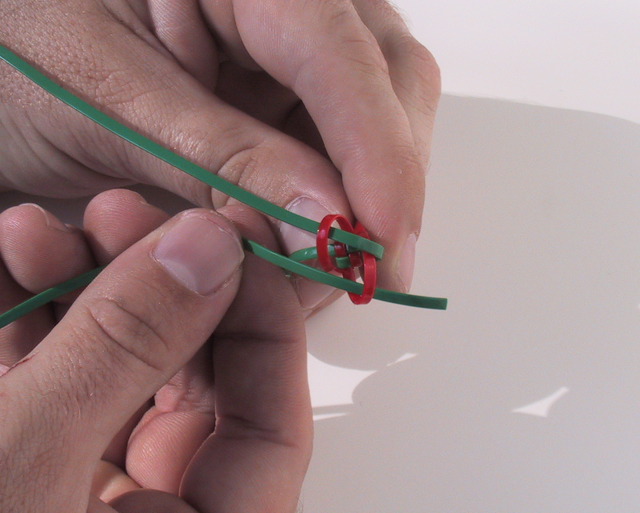
This 'over and under' aspect is the big thing to learn- once you have the idea down, everything else follows from this.
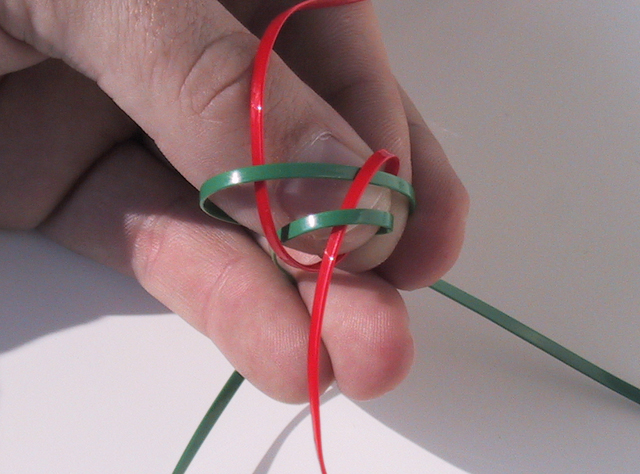
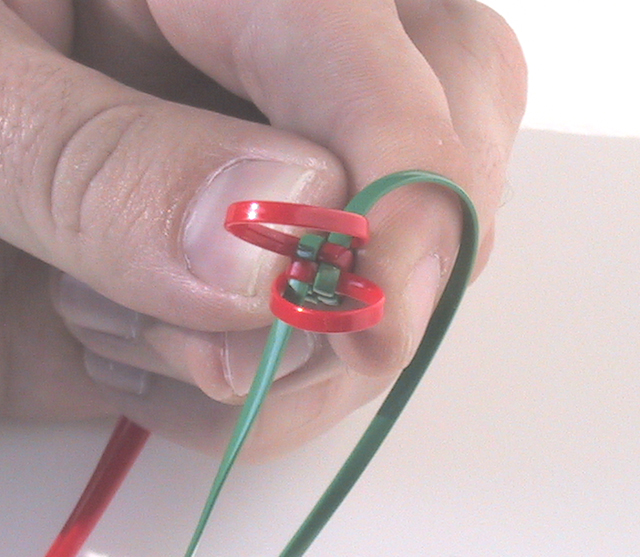
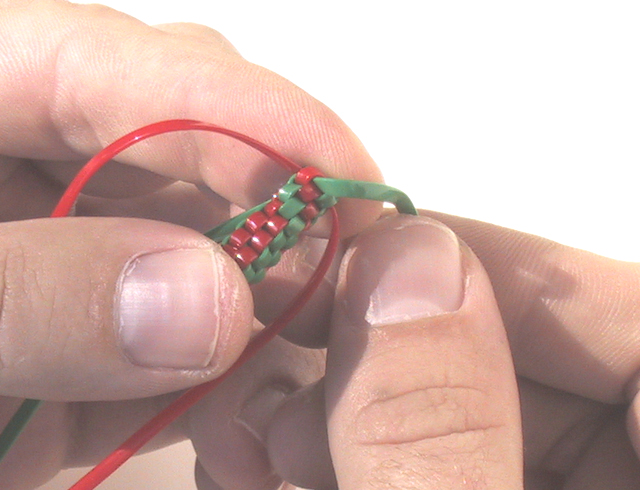
Get ahold of all 4 strings.
While you can, of course, hold it however you like, i've found this the best way because it allows me to pull each string at roughly 90 degree angles- the natural directions the strings are coming out of the lanyard from.
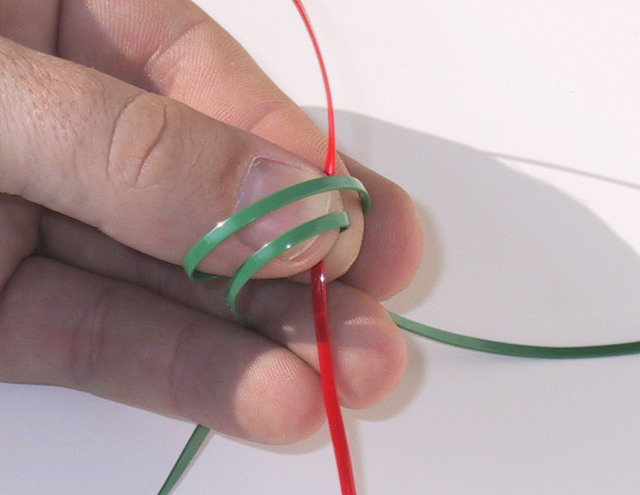
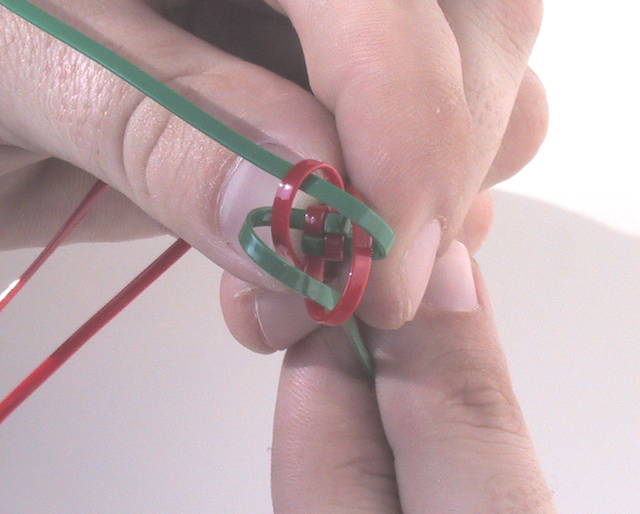
Pull the strings taut, but not so hard that you start to stretch any of the strings.

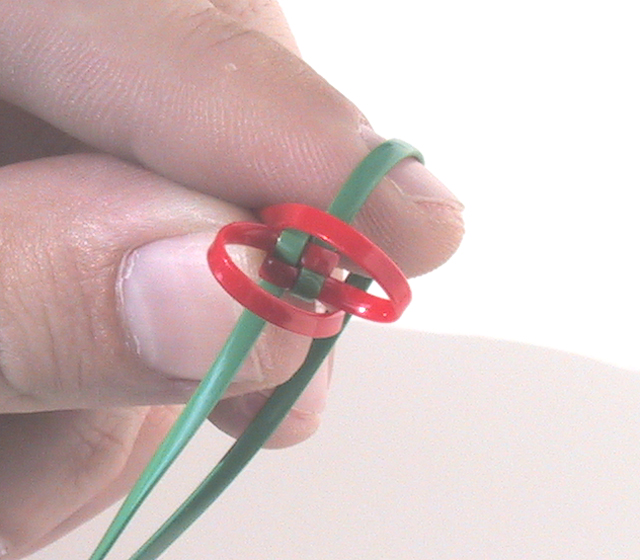
This is what the lanyard should look like after 4 stitches.
Once you've got a few stitches done the body of the lanyard will give you something to hold the first 2 strings of each stitch against.
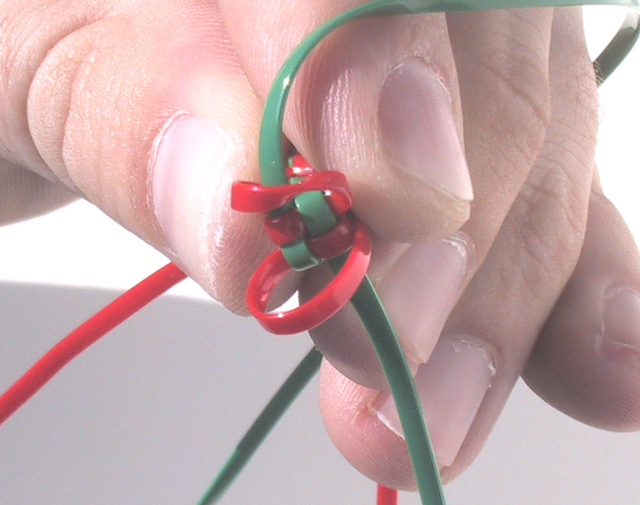
Section 2: 4-String Lanyard, Circle Stitch
This is how the first 2 strings cross over in a straight stitch.
See how they go straight across?- Each string goes back and forth over itself.
To do a circle stitch, send the red strings across diagonally.
This is the big difference between straight and circle stitches.
Everything else- even the most complex circle stitches, are based on this.
When you send the first green string across, it goes diagonally too.
Pull the green string through, taking up the slack.
See how that holds down the red string on the right?
Send the other green string across, over then under.
Pull the green string through, taking up the slack.
See how it holds down the red string on the left?
Pull all 4 strings taut, tightening and closing the stitch.
Several circle stitches in a row will look like this.

Circle stitches travel around in one direction.
Straight stitches switch directions.
So if you're doing circle stitches, then do a single straight stitch, then go back to doing circle stitches, the circle will change directions like this.
Section 3: Twisties And Clips
Twisties happen when one of the strings gets twisted and that twist gets held in place by a stitch.
What typically happens is that you'll notice it only several stitches after when the twistie happened.
It will look bad and you will be annoyed because whenever you look at your finished lanyard, you will see a glaring mistake.
The problem is that if you undo several of the subsequent stitches in order to go back and correct this, you'll find the strings want to stay bent wrong and are more likely to stretch.
As for when a string stretches, you have to be very careful if you don't want it to break.
When you buy your lanyard string, look at the different types and colors- you'll see some thinner strings (usually in very bright colors).
Avoid these, as they have a much greater chance of stretching.
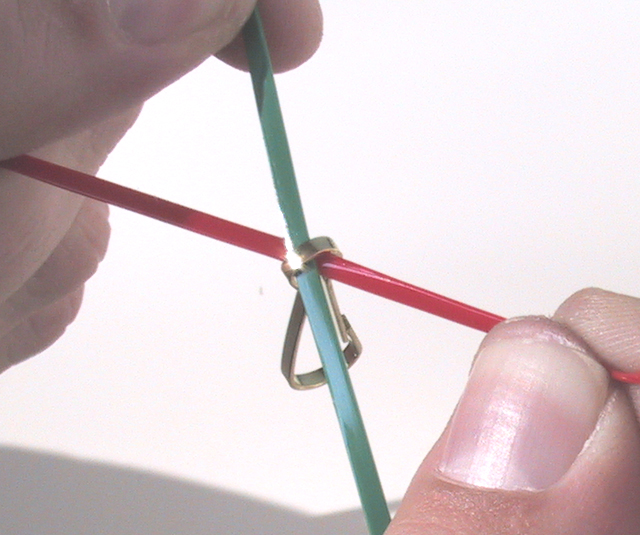
This is the clip I encountered most often at summer camp.
Clips are nice because you can attach your lanyard to something like a keyring or you can attach several lanyards together so they're not just floating around loose.
If you want to use a clip, be certain to start with it on the first stitch, like in the picture here.
It is possible, but difficult and damaging to the lanyard to add the clip after you've finished the lanyard.
The problem with clips is that they cause wear to the strings where the 2 come in contact.
Over time the clip will break through the bottom 2 strings of your lanyard.
Then your lanyard will start to unravel or, at least, will have an annoying imperfection (like a twistie) that will bug you whenever you look at it.
If you still want to attach your lanyard to something (again, like a keyring), the best way i've found to minimize wear is to use the smallest keyring circle you can find in place of a clip.
 How To Make A 6-String Lanyard
The instructions on this page assume the reader already knows how to make a 4-string lanyard.
Section 1: 6-String Lanyard, Straight Stitch
Starting a 6-string lanyard is just like starting a 4-string lanyard, accept you have an extra color sitting beside one of the first 2.
Send the first 2 strings across.
It's easiest to use the strings for the by-itself-color.

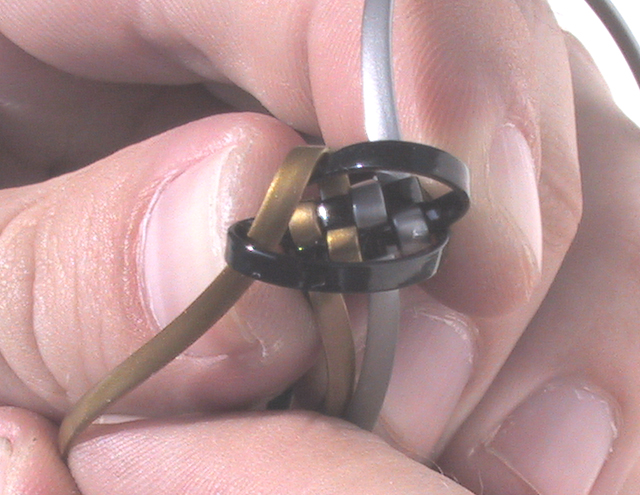
Sending the next 2 strings across (in this case, gold), it'll look sort of like a 4-string stitch.
Once you've done that, send a silver string across, over and under.
Send the other silver string across.
See how the bottom black string holds it in place?
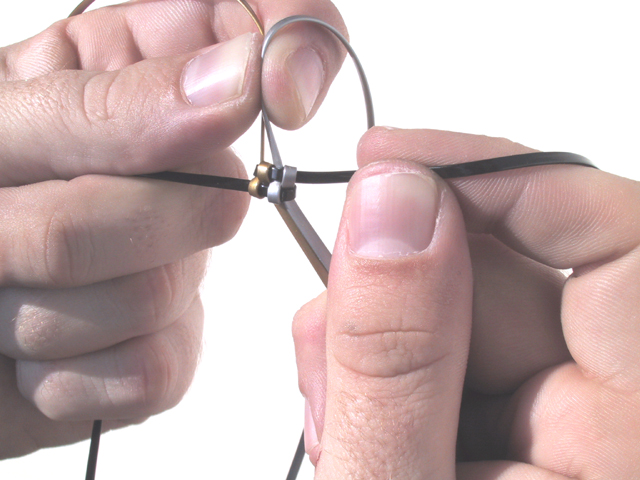
Pull the strings taut, making sure not to stretch them.
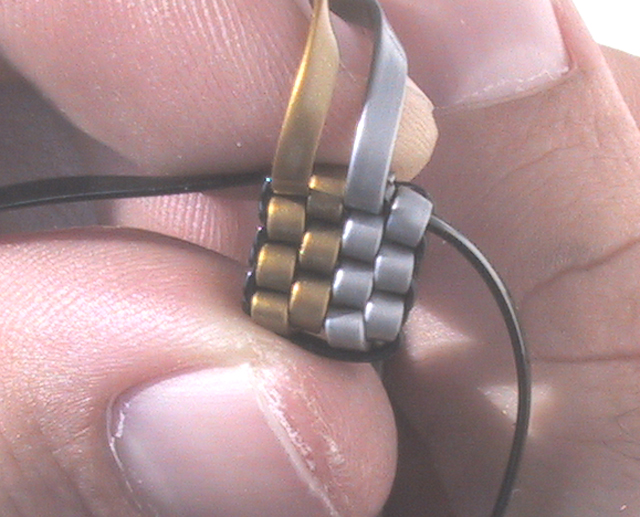
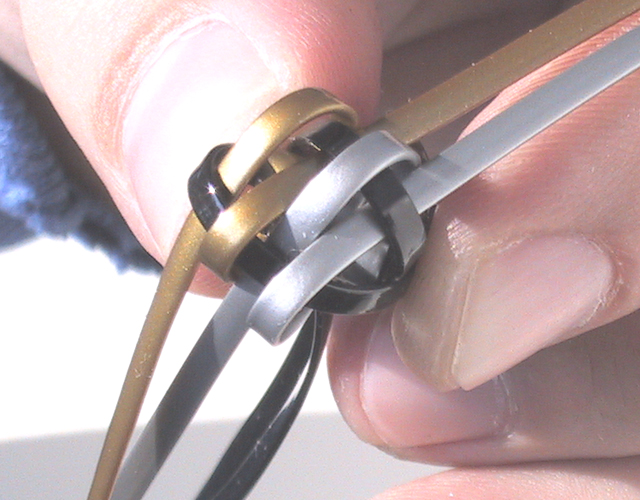
This is how it will look after six stitches.
Section 2: 6-String Lanyard, Circle Stitch
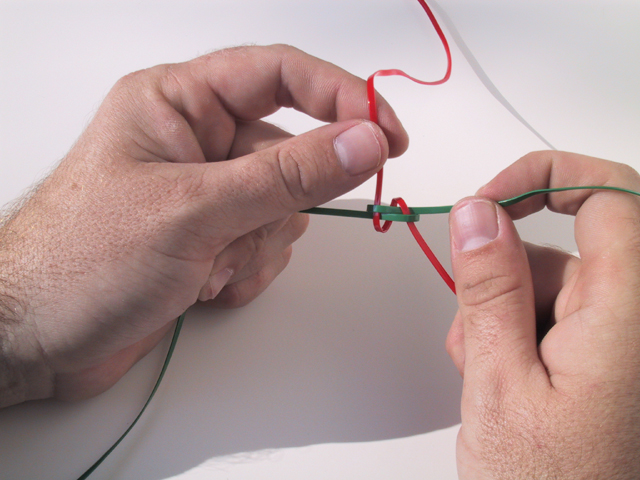
To start a circle stitch, send the 2 black strings across diagonally.
Send one of the gold strings across, diagonally.
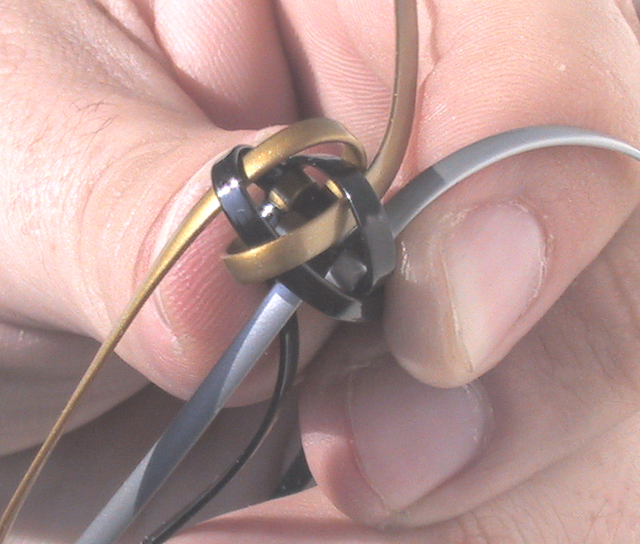
Send the other gold string across.
This was the part I had the hardest time remembering when I was first learning- the gold strings cross diagonally to each other.
They do not mix with the silver strings.
Send the 2 silver strings across, diagonally.

This is how it looks after several circle stitches.
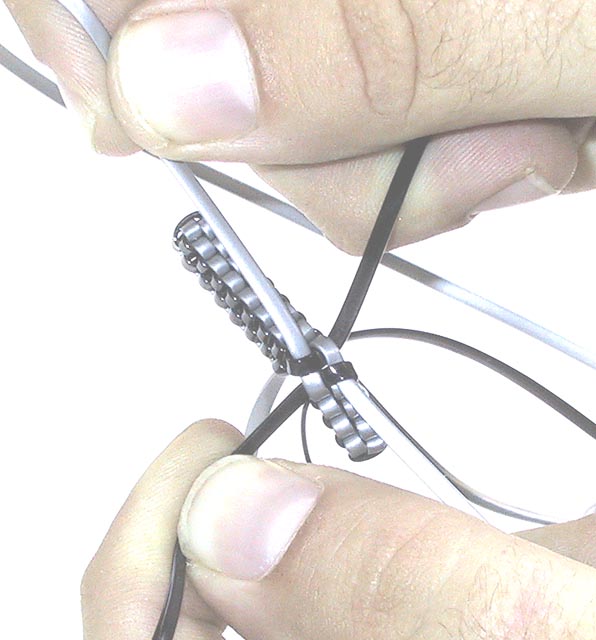
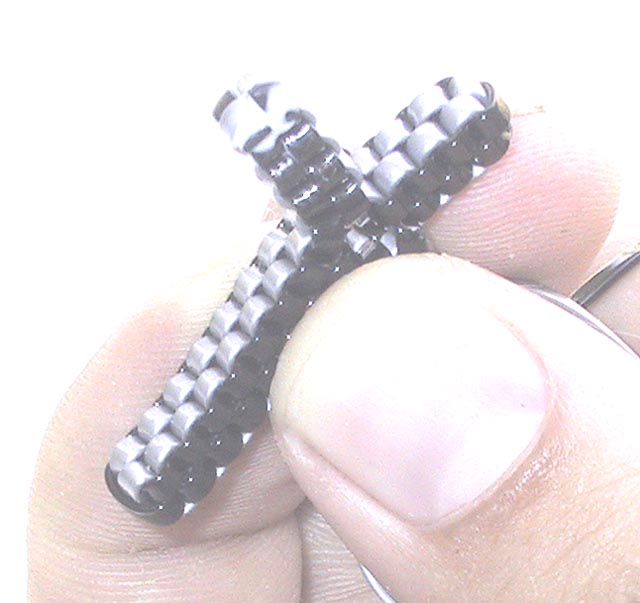
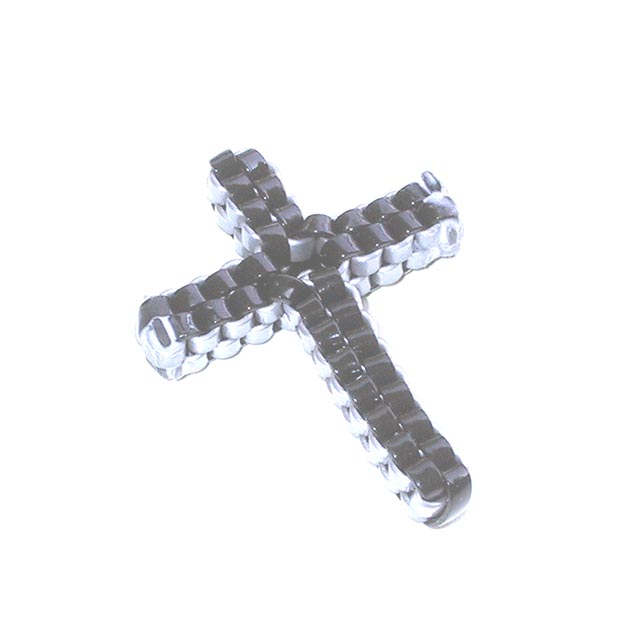 How To Make Lanyard Crosses
Lanyard crosses made from straight 4-string lanyards are the most basic form of joining 2 or more lanyards together.
The bottom 4 images in the Lanyard Gallery are all based off of this idea.
If you can make a Lanyard Cross, you've opened up an incredible number of new possibilities.
Lanyard crossses don't necessarily have to be made with 4-string lanyards, or with straight stitches.
The joining stitches will be a bit more difficult, but should still work with any number of strings.
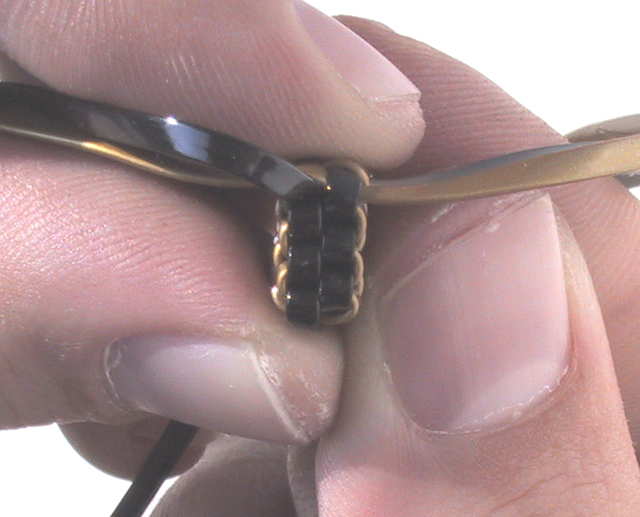
The pictures on this page all have their brightness turned way up in order to show detail with the black string.

Make 2 separate 4-string lanyards, one of them with 7 stitches, the other with 14 stitches.
The 7 / 14 / 7 / 7 pattern I use is of course a matter of choice.
It just happens to look right to me, and it's the way I was taught, so i'm happy with it.
If you're not, by all means, use whatever combination you want.
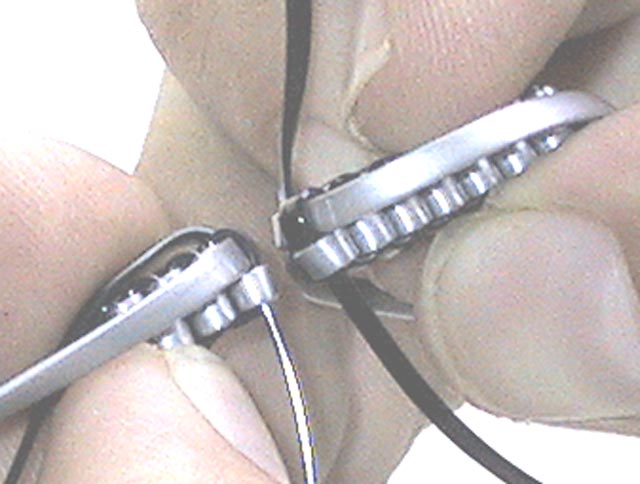
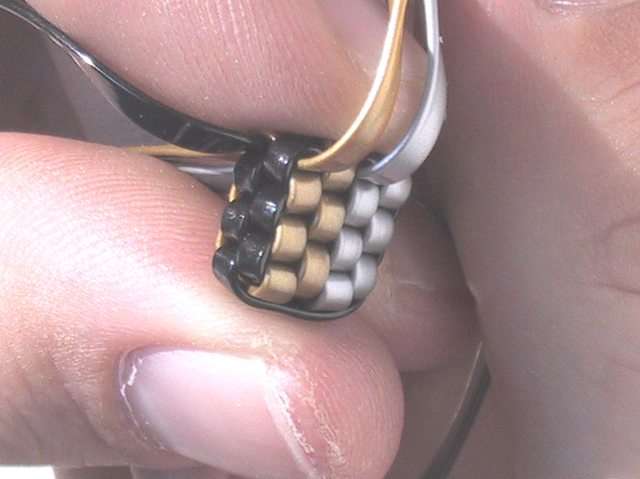
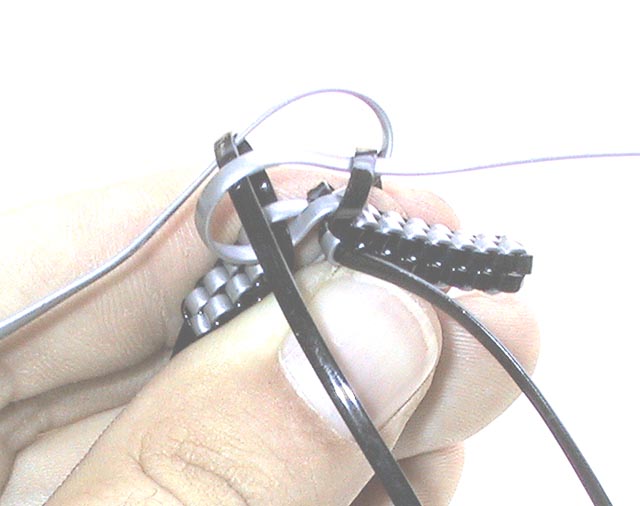
Point the 2 lanyards at each other. If what you have looks like this picture, do this step.
If not, skip to the next step.
See how there are 2 rows of silver stitches on each lanyard?
See how, in this picture, the silver strings are both coming out of the top row?
If your 2 lanyards look like this, add one extra stitch to the 14-stitch lanyard.
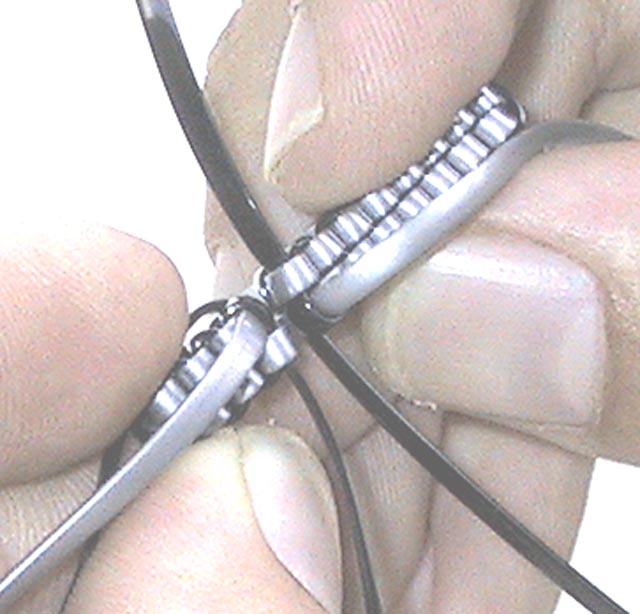
Point the 2 lanyards at each other again.
See how, in this picture, the silver strings are coming out of different rows?
This is the way it should look.
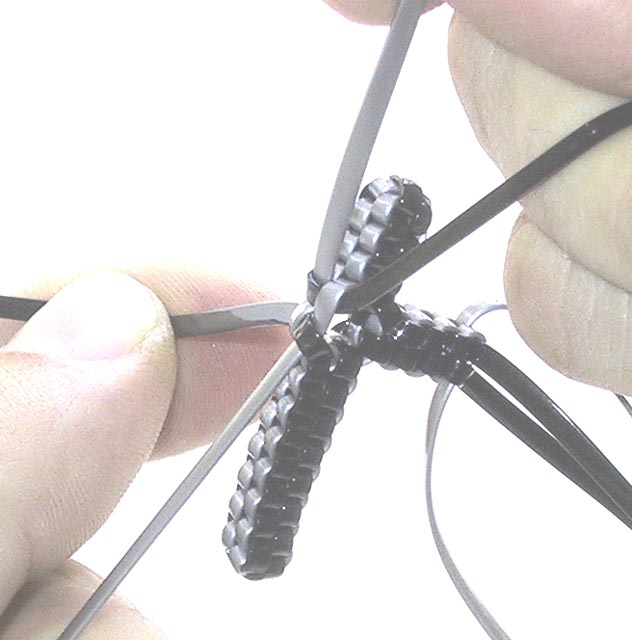
This is the hard part of making Lanyard Crosses.
This stitch and the next one require some dexterity.
Send the 2 silver strings across.
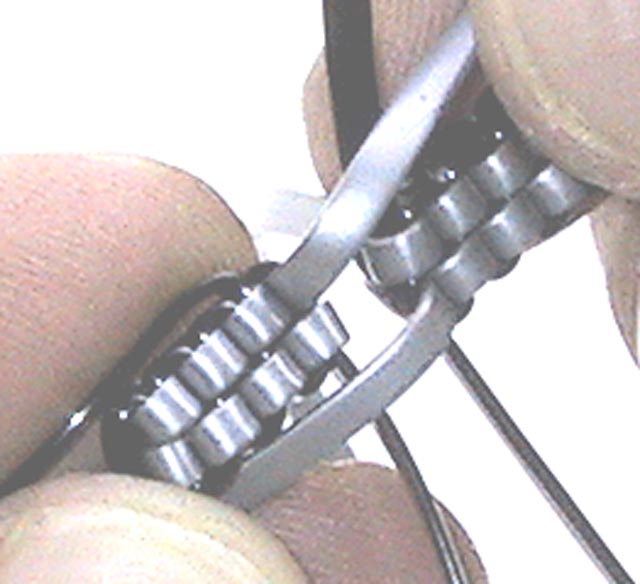
Holding the 2 lanyards at this point is a bit tricky.
If you hold one lanyard and the silver string from the other, you can keep them together with one hand.

Send 2 of the black strings across, over-and-under, just like a regular 4-string lanyard.
The important thing to remember here is to use the 2 black strings closest to the silver strings you're using.
Pull the stitch you just made reasonably snug.
There isn't really anything holding the 2 lanyards together right now, so this stitch will be very loose.
If you set the whole thing down, the 2 lanyards will probably just fall away from each other.
Make another stitch on top of the loose one you just made.
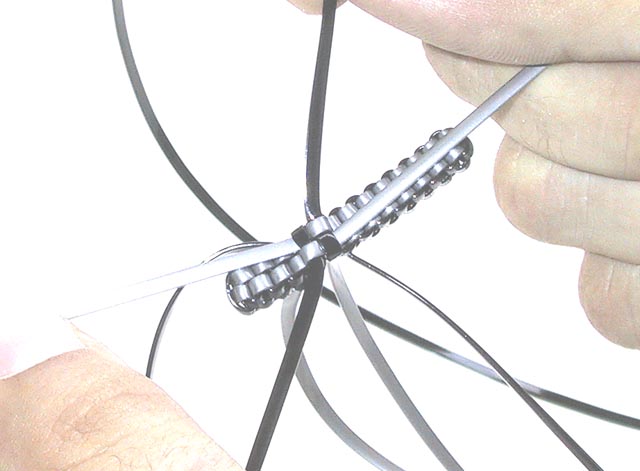
Tighten that stitch.
This should tighten both this stitch and the loose one underneath.
Keep going in this direction until you have 7 stitches.
I don't count the loose stitch here since the loose stitch is sort of diagonal.
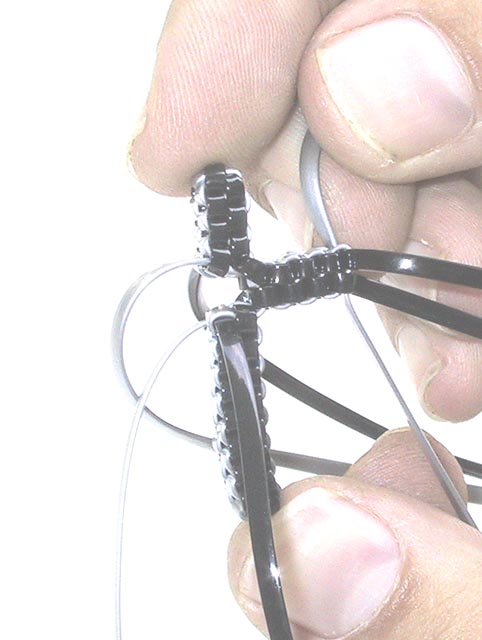
Now you can start on the other side.
You're using the 4 strings you've been leaving alone so far.
The silver strings go straight across, then the black strings over-and-under.
Continue the 2nd side until you have 7 stitches, just like the first side.
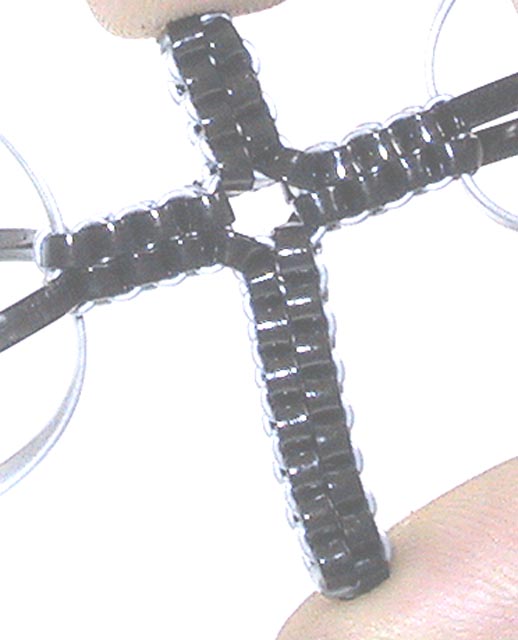
Once you've done this, the cross-ish part of the Lanyard Cross is done.
All that's left to do is finish off the ends.
I don't count this side's loose stitch either, since it's also diagonal.
Finishing Off The Ends
This is the page for making Lanyard Crosses, but finishing the ends is the same for any kind of lanyard.
You should only 'finish off the ends' on the ends where strings are coming out.
The ends where the lanyard started hold themselves together and don't need finishing.
There is a bit of choice involved here- use whatever kind of glue you want, whether or not to use fire.
I've always used plain old Elmer's Glue.
I thought about trying Superglue, but i'm always worried about permanently bonding myself to one of my lanyards.
Choose to use fire at your own risk.
If you leave your kids unattended and they burn the house down as a result of these instructions, it's your own darned fault.
Kids, have your parents read this first and give you permission before you do anything at all with fire.
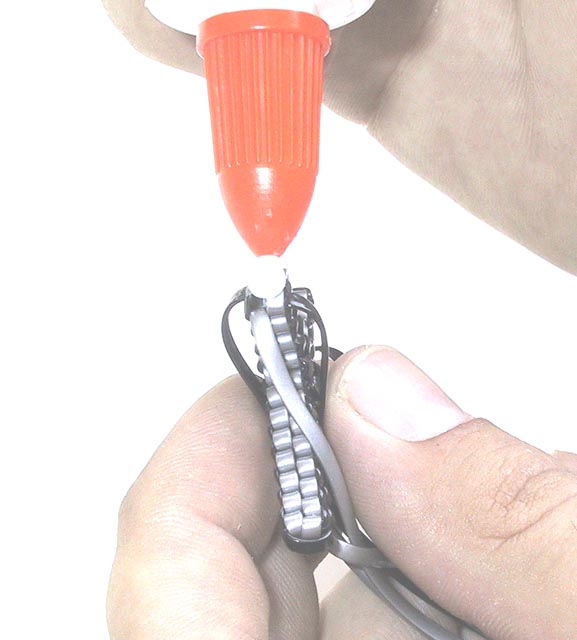
On the last stitch, put a dab of glue.
Not a giant glob like I have here.
Just enough to spread around on the end.
If you do get a glob, don't worry- just wipe the extra away.
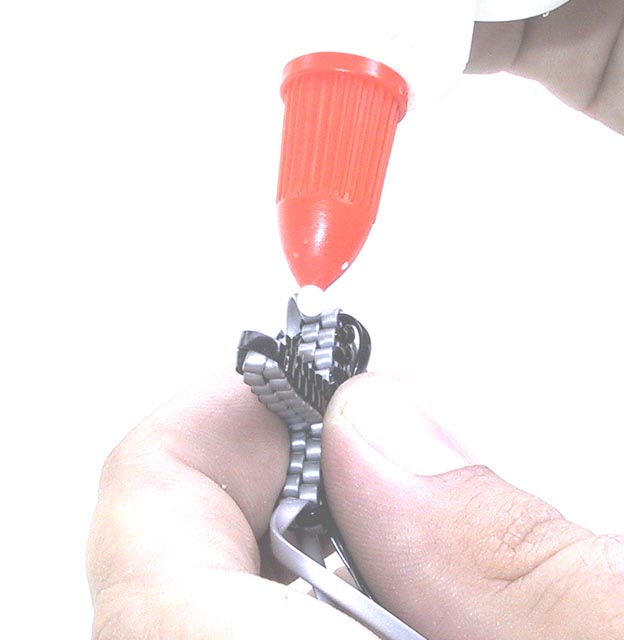
Add a bit of glue underneath each string.
Make sure it gets squished in under where the string comes out.
Wait for the glue to dry if you can.
It's not absolutely necessary, but it helps.
I didn't wait because I wanted to get the pictures finished before dark.
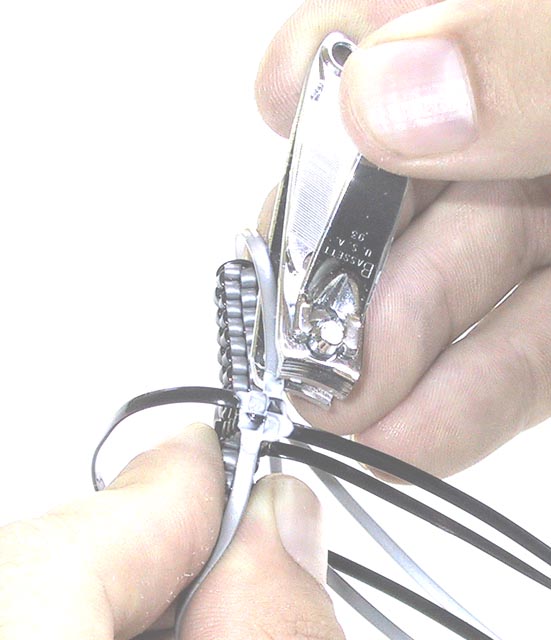
Fingernail clippers!
You can use a knife or scissors, but fingernail clippers are by far the most convenient tool for this part.
Clip each of the strings off so the part of the string coming out of the lanyard is flush with the side of the lanyard.
The end will look something like this now.
This is the point (kids:
ask your parents!) you may choose to use fire.
The best for me is a lighter used in a non-windy setting.
With the Lanyard Cross here, I only had matches and wind, so I was more in danger of burning my fingers than anything else.
So I didn't use them in this case.
Look through the Lanyard Gallery- you'll see some of the ends look a little burnt.
The goal here is to sort of lightly melt the end of the lanyard, just enough to get the string ends in the last stitch to bond a bit better.
Just the end of the lanyard- if you try to melt the whole thing, you'll have a very nice lump of molten plastic and no lanyard.
The lanyard material may be flammable, not like det cord [sic] or anything, but the flame may try to grow a bit.
If it gets uncomfortably large (moves at all beyond right where you're holding the lighter), just put it out and try again.

Repeat the finishing process for the other side of the Lanyard Cross.
Your result should look something like this.
 Lanyard Gallery
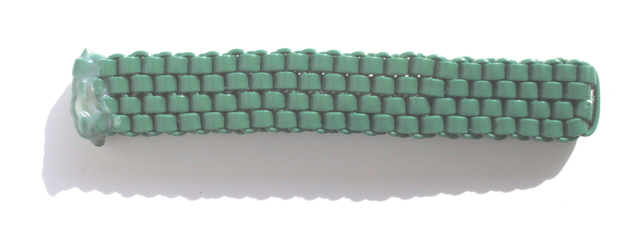
A 2x4 string lanyard. Nice and neat.
A 2x6 string lanyard, all circles.
This is a 2x6 string lanyard following the <circle stitches> then <straight stitch> then... pattern.
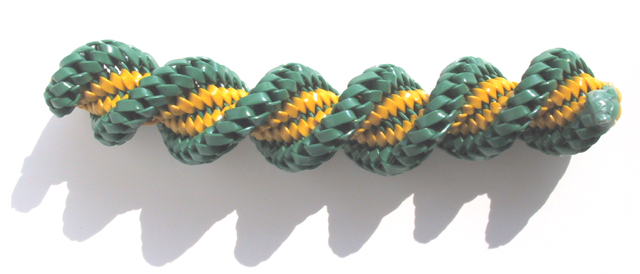
To get this pattern of colors- the one color with the other color twisting around it- start with the edge color, whatever you choose it to be.
The 3 colors together should then be <edge color>, <some other color>, <edge color>.

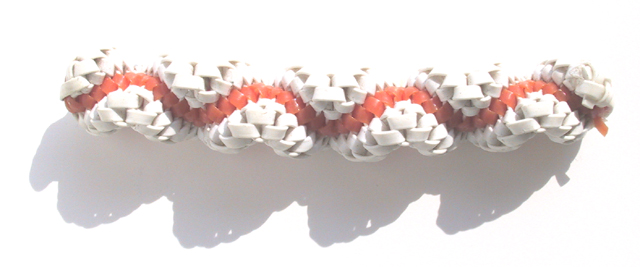
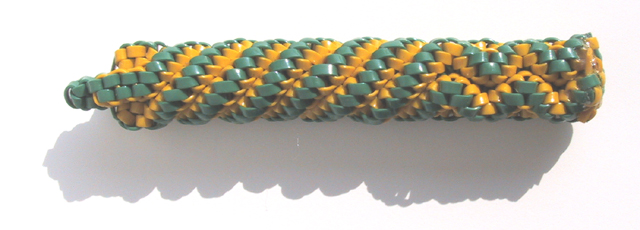
This is a 2x6 string lanyard.
Starting with whatever you choose for the edge color, the side colors should be <other color>, <edge color>, <other color>.
This is a 2x6 string lanyard.
Stitch-wise, it follows the same pattern as the 2nd lanyard on this page.
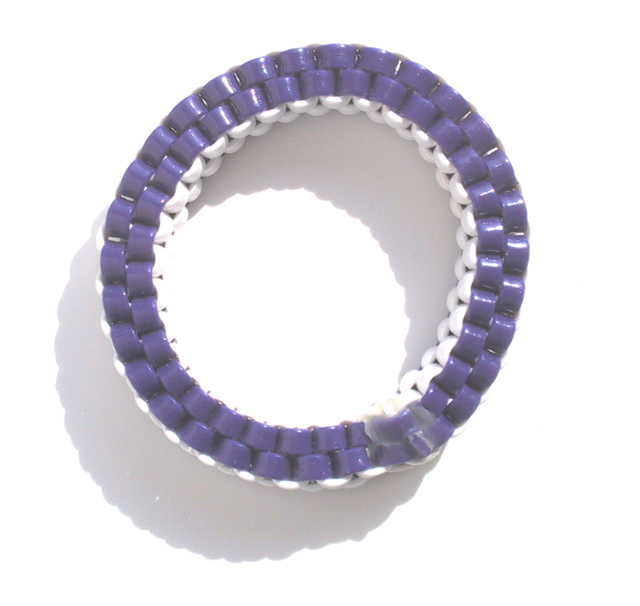
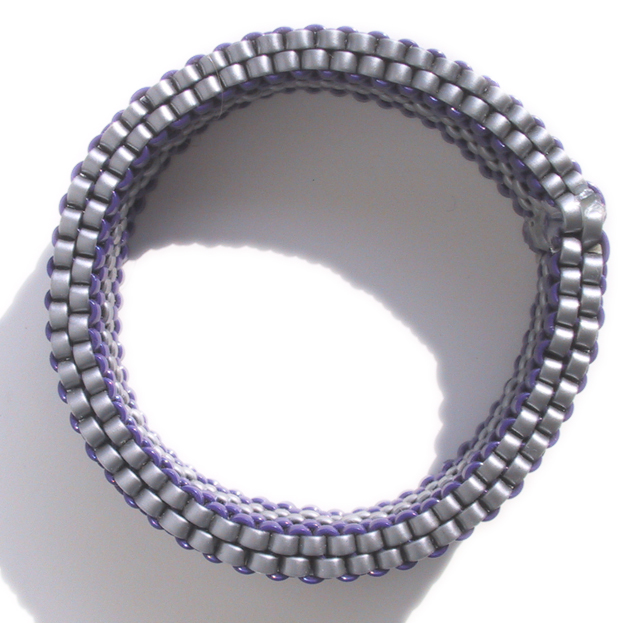
A 2x4 string lanyard, all straight stitches, with the ends fastened together..
The trick here is that the ends aren't just glued together.
The first stitch was left a bit loose.
On the last stitch the strings are woven through the extra space from the first stitch, then glued in place.
A 2x6 string lanyard, same style as above.
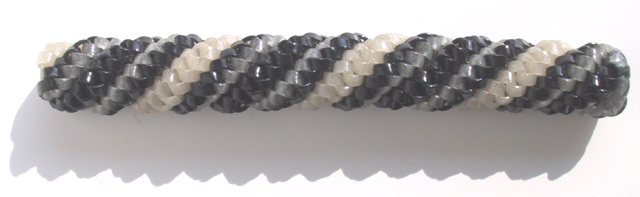
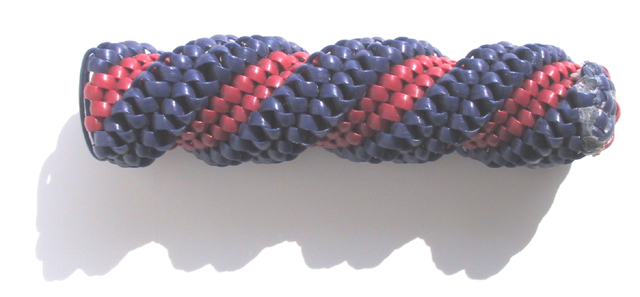
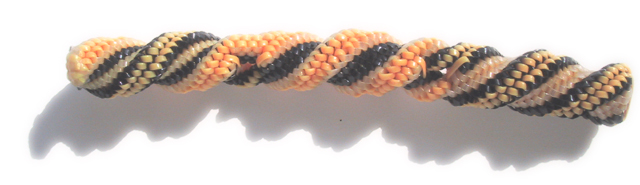
This is a 2x8 string lanyard, all circles.
A 2x10 string lanyard.
Straight stitches, nothing fancy.
This one shows how a large number of strings makes it difficult to keep the stitches even.
This is a 4x4 string lanyard, all circles.
The milky-white color is glow-in-the-dark string.
To get the color pattern here, use the edge color for one of the 2 colors on the side.
This is a 4x4 string lanyard.
A few straight stitches, then a few circle stitches, then straights, then circles, etc..
The trick here, to get the circles to alternate their direction, is to remember how many straight stitches you've done in each section.
For the circle sections to alternate, the number of straight stitches has to be odd.
Think of it as if you're facing forward and keep turning around to look at what's behind you.
If you've turned around once, you're looking behind you.
If you turn around twice, you're looking in the same direction.
This is a 4x4 string lanyard with black & white on one side as well as black & white on the other.
The trick here is that there's a 'cheat stitch' near the very beginning on the right.
The cheat stitch changed the strings on each side from black-black-white-white to black-white-white-black.
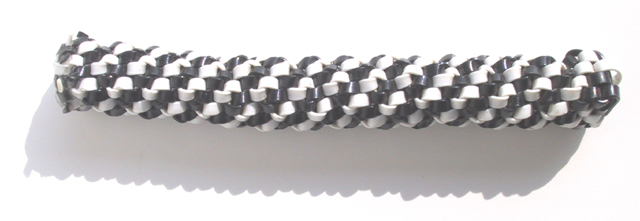
A 4x8 string lanyard, all circles.
A 4x8 string lanyard.
The colors don't look so great in normal light, but the milky white string is glow-in-the-dark, so this seemed like a good Halloween choice.
The gimmick with this one is that at 2 places the 4x8 string set is broken into 2 separate 2x4 string sets, then rejoined.
What happens in the 2x4 string sections controls the changes in the 4x8 string sections- black goes from the outside to the middle, then back to the outside.
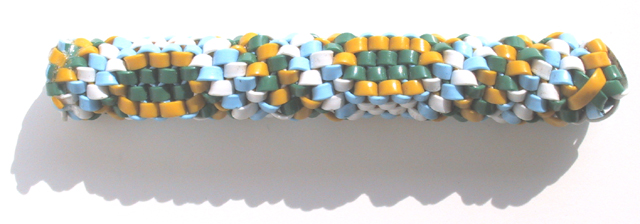
This is a 6x6 string lanyard.
It starts from the left side as a regular 4-string lanyard.
A couple of stitches later 2 more colors are added, making it a 2x6 string lanyard.
A couple of stitches after that another 2 colors are added, making it a 6x6 string lanyard.
Then it goes in circles for about 1/2 the length of the whole thing.
In the last part, on the right side, it does 4 circle stitches then 1 straight stitch (to change the direction), then 4 circle stitches, then a straight stitch, etc..
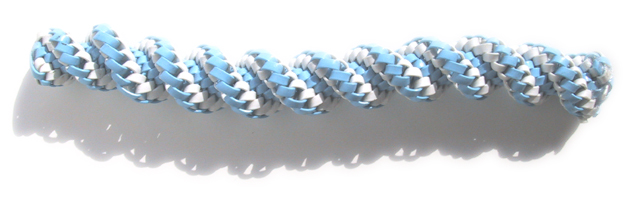
This is a 6x6 string lanyard.
Starting from the right, the pattern is 6 x ( 1 straight then 1 circle), 6 x (1 straight then 2 circles), 6 x (1 straight then 3 circles, 6 x (1 straight then 4 circles).
It really only does 4x on the last part- I ran out of string.
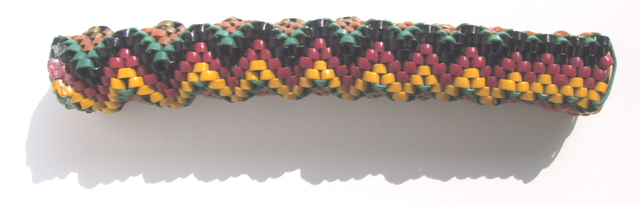
An 8x8 string lanyard.
Orange, red, and brown don't go well together.
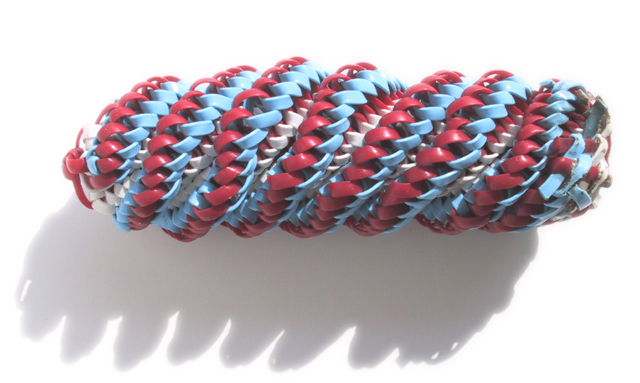
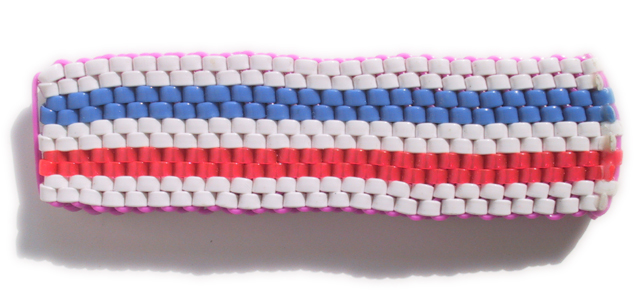
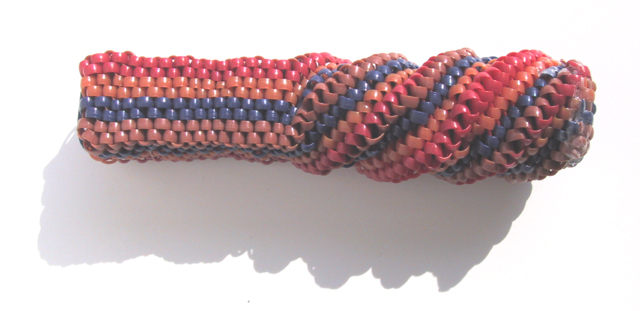
This is a 10x10 string lanyard.
The middle strings (red) are the only ones to go all the way across.
The blue and white strings only cross over the red strings as they go across.
The red strings cross:
blue, white, red, white, blue.
This one shows 2 reasons for not making your lanyard too wide.
Increasing the number of strings makes the tiny differences between each stitch show up more and more, giving the finished lanyard an uneven look.
For wider lanyards like this one, when all of the strings don't go all the way across, the end looks messier and more uneven.
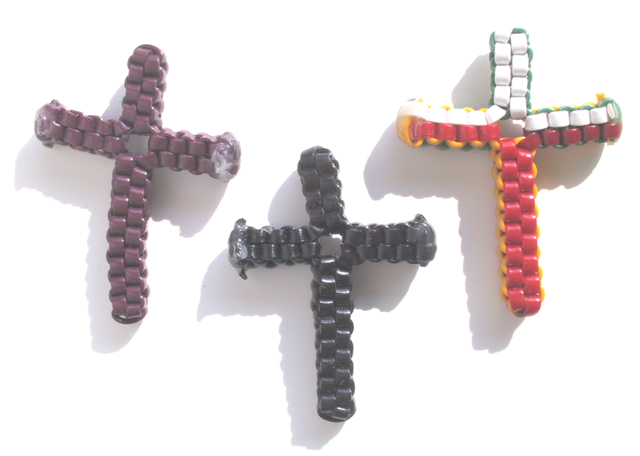
Crosses make nice necklace/keychain/backpack ties.
They don't take long to make.
I ought to be able to make a Star of David if anyone's interested.
Instructions on the main lanyard page for how to make these.
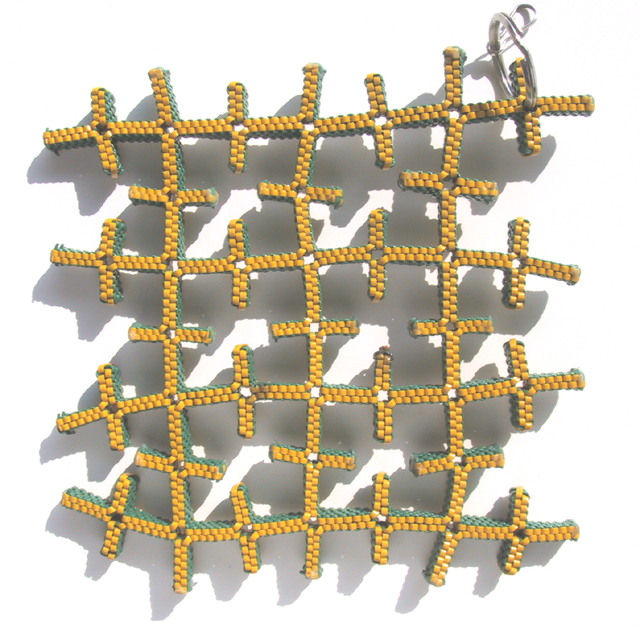
This one's made from 10 crosses joined together.
I was toying with the idea of cup holder made from a bunch of these joined together.
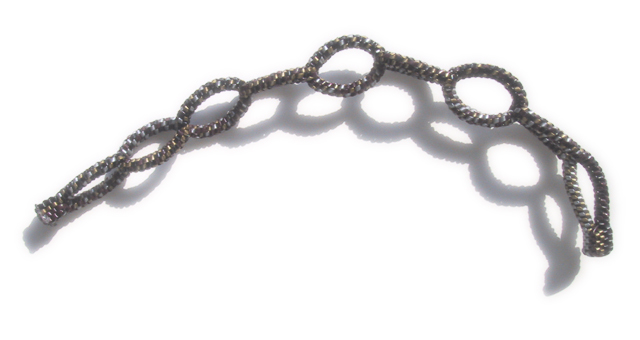
This one starts with a 4x4 string lanyard, then splits into 2 2x2 string sets.
Every 25 stitches or so, the 2x2 string sets are re-joined then immediately re-split.
The 2x2 string sets are rejoined to 4x4 at the end.
For some reason, this one makes me think of onion rings.
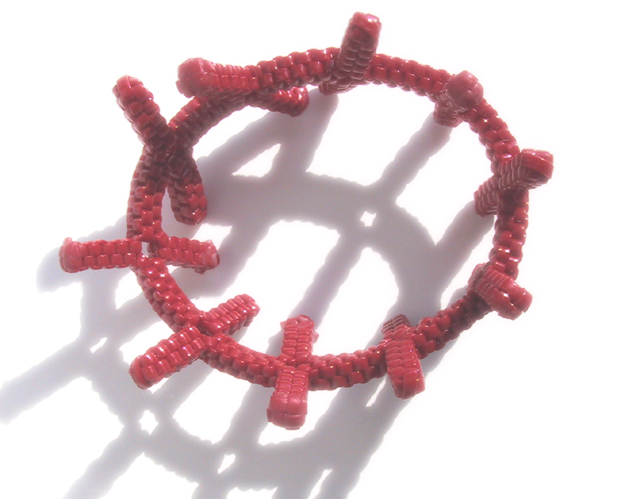
This one is made of 2x4 string lanyards joined together in a manner similar to the crosses.
The idea I was exploring here was the repeating pattern- How big could I make it?
Could I make something like a placemat out of it?
Since it appears that each individual string only has to pass through 21 or so stitches, it should be possible to make one of these as large as one wanted.
I've always wondered if it might be possible to make some sort of full-body suit out of this stuff.